
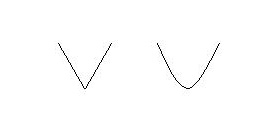
If there was one tool put on this earth to test your skills
of sharpening, it surely is the V-tool. You can look like the
gentleman above in no time. You can rest assured that actually
making them is just as mind boggling, but that is another story
and we will save that for another issue.
Let's start by choosing a V-tool. You want a V-tool that the sides
meet at the bottom with a very small radius. If the bottom is
too rounded on the inside you are better off sharpening the tool
to meet the rounded shape and use it similar to a veiner, because
you will never be able to keep a decent edge otherwise.
The next step is to determine which style of edge best suits
your needs. As with all phases of sharpening there are many variations.
Be wary when you hear that there is only one way to sharpen a
V-tool. If only it were so, our job would be so much easier.
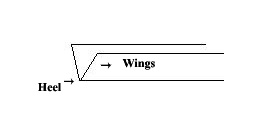
To make sure we are all speaking the same language. The bottom
of the v-tool is called the heel and sides are referred to as
the wings.
(I have also heard the heel referred to as the keel, but for our purpose lets keep it as the heel)

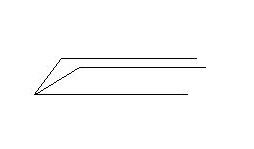
This grind is best suited for decorative cutting, where curved lines are prominent. This works well for tracing. The wings glide through the work and create crisp clean arching lines.
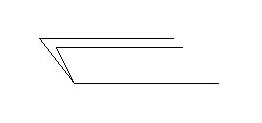
There are advantages and disadvantages to each style of sharpening. I have known some to have all three styles to suit their needs, but most of you will be able to choose the style best suited to your needs. Bare in mind that a slight angle on the wings (forward or backward) will provide a better slicing action.
Okay. - you have decided which grind best suits your needs, it is time to get down to it. The idea sounds so simple, you have two sides that meet in the middle and you need to sharpen both sides until they meet. But it doesn't work that way and suddenly you look like the man at the beginning of the page except you are using profanities. Rest assured it is just another phase of testing your abilities. It just takes a bit of practice (don't you love when I say that?). Whichever method you use for sharpening, belts, grinding wheels, or stones the result is to acheive the wire edge. First check to see that the inside is flat and has no heavy scratches, if it does you will need to start there. Heavy scratches can interfere with the ease of the tool to cut through the wood and will also attract rust in high carbon tools. Once the inside is prepared it is time to start on the outside bevels. I find it is best to think of the tool as three separate edges. The outside as two straight tools joined together where the third edge meets. Work one straight edge until it has developed the wire edge and then work the other straight edge until it meets the first. At this point you will want match the grind angle at the heel. This will create the angle the tool enters the wood. Some prefer to create a diamond shape when grinding the heel bevel and others will treat the heel as a small gouge and round it slightly to produce the wire edge. I prefer to round the edge to maintain the cutting angle. You may find on your first attempts that the sides don't line up in the same plane or you develop a small hook at the heel of the tool. If the hook is small you can usually get that out when doing the final honing to remove the wire edge. I have also known some carvers who prefer to leave in the hook as they feel it helps start the cut. If you decide to leave it, use it until the next time you need to hone and remove it then. Another trouble spot are where the wings meet at the heel, there is less material here and if too much material is removed this causes too much hook or hollow spot and your edge will not have any support and wont hold up . Don't panic. You may have to take the edge off a few times. When you blunt the tool you are able to see where the thick and thin spots are and work them accordingly. With a little patience and a light touch you will succeed. Once you sharpen a V-Tool you can handle any tool with confidence.
The most common mistake is over sharpening your tools. By maintaining
your edges using a hard leather strop or buffing wheel you should
rarely have to revert to actual grinding. Stropping the bevel
edge is all you need to do to maintain our edge. You don't need
any special shapes for stropping the inside of a V-Tool, as long
is it is left flat. The only time you need to reach the inside
is to remove the wire edge right after initial sharpening. The
hardness of the tool dictates how long it will hold an edge. Our
tools will hold an edge indefinitely with basic stropping for
edge maintenance.
When all else fails we do sharpen any of our tools at no charge.
You pay the shipping and we take of the rest. We also sharpen
your other tools for a fee.